Carmen Nordback’s Aunt Millie’s Garden quiltI was in the Minnesota Quilters Show this past week where it received first place in the Appliqué Small category. Of course it won first place! I love the whole quilt and especially the border background treatment.
Carmen says “I reduced the size of the bocks from 14” to 10” so it was smaller than the original pattern. It was so much fun to make! Thanks again for all you do to create such fabulous designs.”
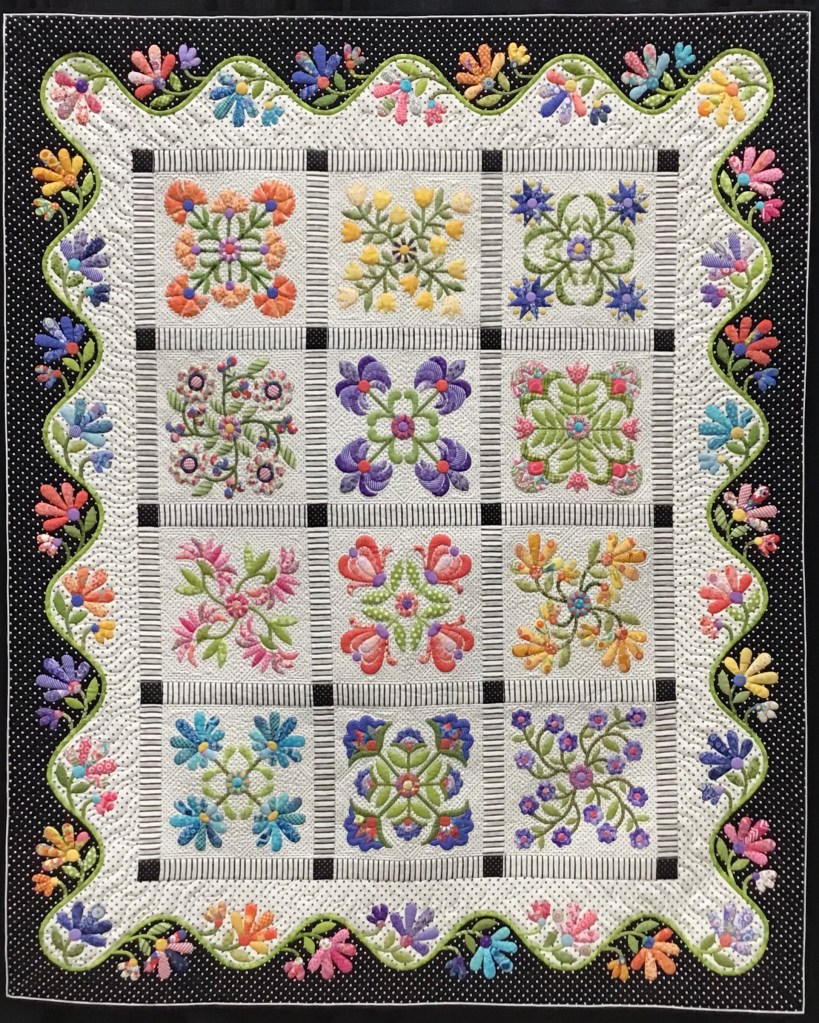
Thank you, Carmen, for sharing your beautiful quilt with us! It is a joy to behold :-).
Click here to find Aunt Millie’s Garden eBook.


Stunning quilt! Thanks for sharing the picture. Congratulations to Carmen on the ribbon!
LikeLike
This is beyond gorgeous! I don’t even have adjectives worthy of this quilt. What lovely color choices and impeccable workmanship. This is simply stunning!
LikeLike
Just finished a Yoko Saito inspired appliquéd wall quilt and thought I would take a break from appliqué until I saw this quilt, hmmmm….
LikeLike
Beautiful!
LikeLike
OMG…that is gorgeous, the colors are perfect love it!!@!
LikeLike
What a beautiful quilt. Great job, Carmen.
LikeLike
Beautiful quilt! Fine job!
LikeLike
Just exquisite…workmanship and fabric choices! Wow…such talent!
LikeLike
Congratulations! It is beautiful 😍!
LikeLike
Stunning! Love following you
LikeLike
I absolutely love that. It’s been on my list to do for a long time. I should get going on it!!
LikeLike
So much to love about this beautiful quilt.
LikeLike
Gorgeous! Beautiful work!
LikeLike
A work of art…stunning!
LikeLike
That’s beautiful!
LikeLike
Gorgeous!!! Fabulous work… Congratulations…PERFECT QUILT…
LikeLike
Thank you all for your kind words! This quilt was so much fun to make! The border change was a bit of a challenge but I’m pleased with the results. My thanks to Becky and Linda for creating such a wonderful design.
LikeLike
I enjoyed making this quilt but this is the most beautiful Aunt Millie’s Garden I have seen. How did you do the two fabric colors for the border?
LikeLike
Thank you, Ellen. Yes, the border was a bit of a challenge. After the center was pieced I decided how wide I wanted my finished border to be. I then cut freezer paper the size of the finished border and longer than I needed, made some registration lines and folds. Then just started playing with the vine shape with pencil and a good eraser. I folded and mitered the corner to make sure I liked the curve in the corner. Once I was done with my paper pattern I cut two layers of fabric the same size (including an extra inch all the way around) and placed them together right sides up. I sliced my freezer down the center of the vine and ironed half of it in place on the border. I then stitched next to the freezer paper and again about an 1/8” away. Lastly, I carefully trimmed away the black from the inside part of the border and the white from the underside of the border next to the machine stitching. All of my borders were a little extra long in case I needed to fudge a little at the miter. I placed and appliquéd my flowers except where the miter would be, appliquéd the vine except the corner areas. Sewed my borders to the quilt mitering the corners, finished the corner flowers and vine and breathed a big sigh of relief. The part that took the longest was figuring everything out on the freezer paper first. More than you wanted to know? Probably. I couldn’t find any instructions on how to do it so I just went for it. It won’t be the last time I use this border treatment.
LikeLike
Thank you for that explanation. The border really makes a difference!
LikeLike
Brilliant! Using freezer paper was a really great idea!
>
LikeLike