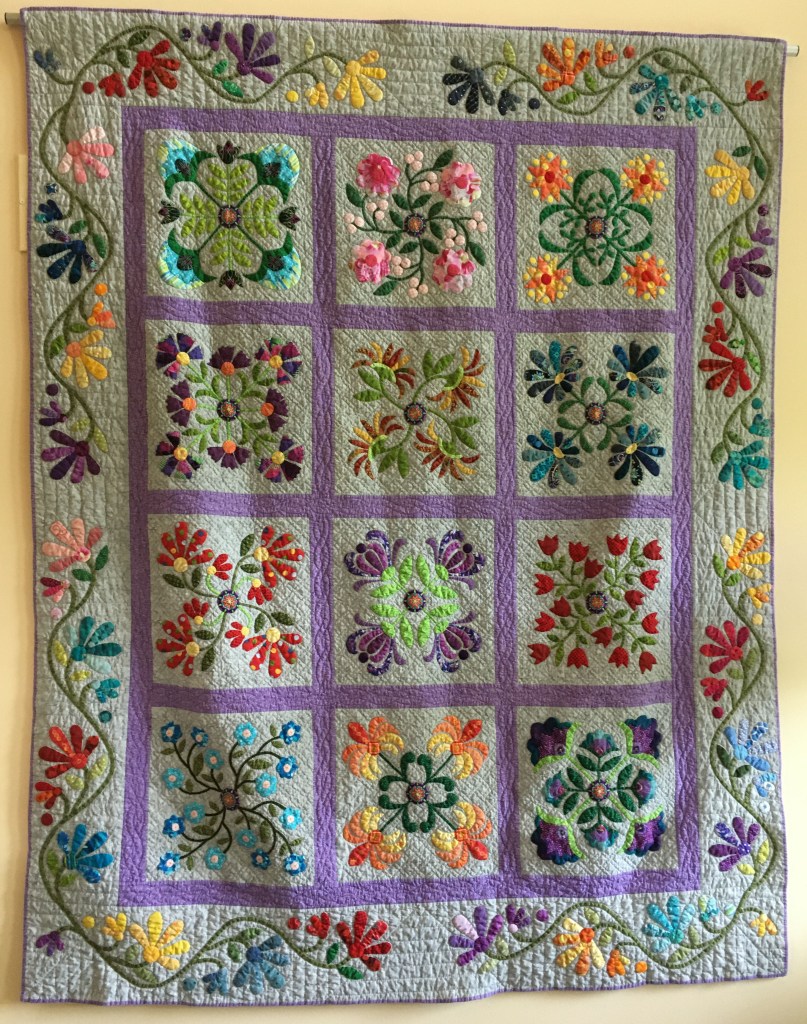
Show and tell…

I love show and tell, don’t you? Nadine Hogrefe sent this recently. The story she posted to go with it on Facebook follows. FYI: This is A Walk in the Mountains, one of our blocks of the month. Click here to find the digital patterns.

From Nadine: Good Morning Everyone! Today’s Project! Pin basting a 56×62” wall hanging! So many memories with this one. I purchased this Piece O’ Cake appliqué quilt kit at a Lancaster PA Quilt Show in 1998. My Aunt Jean (my quilting mentor and true soul mate) took me to this show and we both bought this kit. We both finished building it about the same time….she quilted hers very soon. I, on the other hand being true to myself, got chasing other beautiful shiny objects and allowed it to hang marinating in the quilt top closet until yesterday. NOW is the time to get this sucker finished! Aunt Jean told me too! Oh how I still miss you😢…..”

Linda made the original quilt and it is a design that stands the test of time. Nadine, great job and I know I’m not alone when I say ‘well done’! Thank you for sharing.

Wednesday Giveaway

Bev Roope and Susan Green are this week’s lucky winners! Each will receive a very cute wool pincushion directly from Nancy and her daughter, Meredith, at Wacky Woolies. If you are not Bev or Susan, you can find the wooly wonderful creations on Instagram at @wackywoolies4sale or email Nancy directly at njsjones1@gmail.com.

Stay healthy and happy and may you have many happy stitches!

Shop for all sorts of sewing notions, books, and other fun stuff at pieceocake.com!

Show and tell…

Jill Isakson sent me this photo of her beautiful finished quilt.

 Jill says:

My quilt, My Lucky Stars, is finished.  My friend Linda Neal did the appliqué border.  We adapted the pattern slightly to fit a square quilt. The appliqué border really finishes and frames the quilt!  It was in the Dallas Quilt Show which was unfortunately cancelled but the judging did take place and it received a 2nd place ribbon.

Congrats to Jill and Linda! What a lovely quilt and I thank you for sharing it :-).

FYI: The border design is from the Anniversary Quilt, which is in Flowering Favorites. I’m not sure of the pattern used in the quilt center.

Wednesday Giveaway

Michelle D is this week’s lucky winner! She will receive this set of hand-dyed wool thread from In The Patch! Use it with wool or cotton fabric to make lovely, fuzzy stitches.

See you next week for the next Wednesday Giveaway. Until then you can shop for all sorts of sewing notions, books, and other fun stuff at pieceocake.com!

Making masks, because we can! Updated 4/25/2020

I said not long ago that quilting is our super power, and it’s true. We can sew, we have fabric and thread, and we can make masks! Just to be clear, these masks do not provide 100% protection against viruses. But some protection is better than zero protection.

You don’t have to look too far to find medical institutions who will be very happy to have any masks you make. My masks are going to my friend Helen’s family practice. She, the other docs in her practice, and all their staff need masks that can be washed and reused. My first batch will be tested tomorrow.

Here is a link to the site where I found the mask pattern by Jennifer Murphy: https://www.instructables.com/id/DIY-Cloth-Face-Mask/

There is good information on that page and you might want to read some of it. I made Mask 2 which does not have a filter pocket because what, exactly, are we going to put in there to be an extra filter? [It has been suggested that fusible interfacing might be a good filter. I have no idea of this is true or not.] This mask has two layers of woven cotton and should stop 50% of droplets in the air. 50% is better than 0%, right? Helen thinks so.

Here are links to the three mask sizes found on the site above. Again, you should probably go there to read what they have to say.

Regular Size

Large Size (not that much bigger than Regular)

Child Size (I haven’t made this so have no idea how big or little it is)

NOTE: If you want to buy a good mask pattern, check out the Valami mask. It is from Valli Schiller and Ami Simms and the instructions are excellent.

The instructions with the free pattern are fine, but I would have added more details. Here is what I would add:

1. The pattern tells you to wash your fabric before you make masks. Please do that. Cotton fabric shrinks more than you think it will AND there are chemicals in the masks that need to be washed out before someone breathes through it.

If the front and lining are different, it will be easier for the user to tell which is the exposed side.

2. I made templates the way I always do for hand applique. I covered the paper with peel and stick laminating sheets to make them stiff and easier to cut around.

I made the Regular size masks. The large is not a whole lot larger. If you need a much bigger mask you could enlarge the pattern by 5%, etc.

3. Measure your pattern and find the size square or rectangle that it fits on. The Regular pattern fits on a 6 1/2˝ x 6 1/2˝˝ square.

Cut 2 strips 6 1/2˝ wide. Each strip makes 3 fronts or 3 linings. Two strips = 6 masks.

Place your strips right sides together and cut 6 1/2˝ x 6 1/2˝ squares. You will need one pair for the front and one for the lining.

Stack pairs of squares as deep as you can comfortably cut. I cut 4 layers of fabric at once.

4. Place the template over the stacked rectangles. I cut around the template carefully with your rotary cutter. Try not to cut your pattern.

5. Sew cut pairs together along the long curve, for both the front and lining pieces.

6. Press the seam allowances to one side, not open.

7. Place a lining and front right sides together. Sew them together along the top and bottom edges.

8. Clip the deeper inner curves on the top, on either side of the nose peak.

9. Turn the masks right side out and press the seams. I used the pointy tool to reach inside and push the seam into place.

Here’s quick video showing the pressing and how to turn the ties (bottom of this post) right side out:

10. Top stitch 1/8˝ from the pressed seams, top and bottom.

11. You must put a 3-4˝ wire in the nose peak so that the mask fits snugly. I am using 20 gauge electrical wire. It is copper covered with plastic that is easy to shape, washable, and the cut ends are not sharp.

12. To make a casing for the wire, sew from the outside in about 1 3/4˝ from the nose peak and then turn to sew a 1/2˝ casing parallel to the curved outer edge. When I got to the far end I inserted the wire, then turned the mask to sew the casing shut. Be sure to begin and end with knots or back stitching so the seams stay sewn.

13. Press the raw ends on each side of the mask to the inside 1/4˝, and then in another 1/2˝ to make a casing for the ties. Sew the casings.

14. Cut two 3/4″ x 20″ strips from a T-shirt to make ties for one mask. Cut even with the hem or up the shirt… it works both ways.

15. Cut a piece of heavy wire 15˝ long. Bend it in half and, if you want to be fancy, tape the cut ends together to make a threader.

16. Stick the looped end of the threader through the mask casing. Insert a little bit of one tie through the loop.

17. Pull the tie through. Repeat for all mask casings.

18. The tiess can be tied together behind the head, or…

…loosely tied together to make ear loops. Do not tie the ties too tight and untie them before washing or you will have a forever knot.

I am going to set myself a daily goal and churn these out, 10 or 15 at a time, until there are enough. I would make more but there are steps that make my hands hurt. It may be the same for you… the important this is to do what you can if for no other reason that if we all do what we can

PS: This is serious stuff but I when I see the masks together, I think: nose bras. Am I crazy or do you see it too?

Stay healthy and happy sewing.

Show and tell…

Susie Johnson sent me a really cheerful show and tell! This from Susie:

Dear Becky – Thought I might finally share a couple photos with you. I finally finished the pillow shams to go with my two twin bed quilts from your Everyday Best pattern. I’ve always adored polka dots and collected polka dot fabrics for years (long before they were all the rage) determined to make your quilt pattern but using only polka dot fabrics. The quilts were finally finished a couple years ago but I thought shams would look great so … ok, I’m done now thanks to a self-imposed COVID-19 quarantine. 

Thank you from the bottom of my heart for all your generous tutelage and creative inspiration over the years. Stay safe and sew on during the difficult days ahead.Best wishes- Susie Johnson

I LOVE these quilts and the pillows are just perfect with them on the beds. Thank you, Susie, for sending such happy quilt pictures!

FYI: Click here to find the Everyday Best downloadable pattern. The round blocks are sewn on foundation papers.