Alzheimer’s Quilt Donation

Good Morning!!!!. Well it was morning when I started this blog. I had some problems so now it is the afternoon. My husband Paul has had the crud this week. So we have been hibernating. You know if you take medicine it takes 14 days to get over and if you don’t it takes 2 weeks.

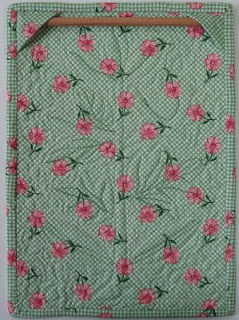
I have been clearing my desk and working on projects in my studio. One of the projects is a small quilt for the Alzheimer’s Art Quilt Initiative. The quilts are no larger than 9″ x 12″. here is the one I am sending. It is a block from a class I used to teach. It made a pretty little quilt to donate. 
While working in the Alzheimer’s booth at Quilt Festival I noticed the greatest way to make a sleeve for these small quilts. I thought I would share it with you here. You can two squares 2 12″ x 2 1/2″. Then press them into a triangle. Next, before you put your binding on the quilt place the raw edges along the sew line. Sew the two squares to each of the top corners along seam line.sides, That’s all there is to it.
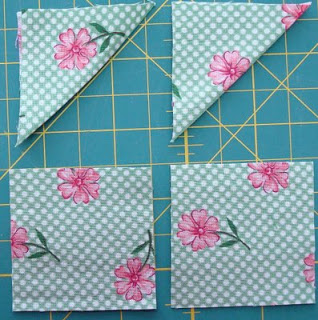
Place a small dowel rod in the pockets and you are ready to hang your quilt. I put a pencil in mine. Saved a trip to the hardware store.
Till next time keep quilting. Linda

I’m going on vacation…

Well, not really a vacation – more of a Thanksgiving break. We leave tomorrow after lunch for Oklahoma City (OKC) where we both have family. I’m scrambling to get everything ready and am not finding time to blog. BUT – there is a wonderful treat coming on Monday. You’ll like it, I promise! 


I might find time to post between now and then, but I also might not. I’m going to leave you with this wonderful photo of my Aunt Esther and my grandmother, Nan, aka Mabel Eckroat. She was born not long after 1900 and died 6 years ago. (I am so very bad with dates that I don’t have the exact ones in my head. I hope I am never in charge of writing an obituary.)

Nan was a stitch! She sewed many of my clothes as I was growing up. She even made my senior prom dress (a halter-top!). She was not a quilter but that’s OK. In the picture below she and her sister are pretending to be “bad” – with fake cigarettes! This photo is taken outside of their family home in Cheyenne, OK. When she was little, Nan lived in a dugout (an underground house) so this house is something the whole family was proud of.

I could go on, but I won’t because I have to get ready to leave tomorrow :-). Later, I’ll post more family photos. I have some really wonderful ones!

My grandson…

I took this movie of my grandson, Jack, a few weeks ago and am just now getting it posted. The boy crawls with his leg bent funny. I’m a normal grandmother so I sort of worry about that but it is my hope that he will walk straight and tall! I will share (and I hope not bore you with) another movie soon!

FYI – those cloths on the floor are there because Jack put them there. He has a drawer full of  (clean) rags that I let him pull out, then I put them up, then he pulls them out… you get the idea.

Something purple…

Steve and I worked in the yard some this morning. It is overcast today, but not raining and it is cool, but comfortable. I raked and cut back plants that needed it. Steve dug up saplings that were growing in bad places. 

I hate to say it but now my hands hurt. There are many good aspects to getting 
older… but knowing that your body is beginning to fall apart is not one of them. Thank goodness for Advil!

I took these “purple” photos when I was in Baltimore and I’ve been saving them to share with you. I have no idea what this flower is but isn’t it cute!

Cinnamon apples…

Every year at Thanksgiving and Christmas my grandmother, Mabel Eckroat, made cinnamon apples. I cannot image a holiday without them! 

Cook apples in a mixture of water, sugar, and red hots. Use apples that are firm and round. Granny Smith’s are a good choice but. Choose a wide heavy pan to cook them in.
Begin early in the day. Pour 6-7 cups water into the pan (2-3″ deep). Add 1 cup of sugar and 1 bag of red hots. Turn the heat to low-medium. Stir occasionally until  the red hots are melted. 
 

Core, peel, and slice 2 apples into 1/4″ thick rings. Place the slices in the pot, overlapping as necessary. You can try cooking 3 apples at a time after your first batch.

Let the apples simmer. When they look about like this (below), carefully turn them over with a slotted spoon. You can flip them more than once as they cook.
TIP: Keep your spoon in a 2-cup measuring cup that has water in it. If any gooey red hots get stuck to it they will get dissolved off the spoon.
 

The first batch takes the longest, up to an hour or more. If you have too much water, the apples will lose their shape. This corrects itself as water is cooked off. Too little water and the syrup gets too thick. You can add more water but it’s better to add it between batches. You should see simmering, not a rolling boil.
 

The finished apples look like this (below). NOTE: The first batch of apples may not be this dark. I think this is because the it takes a while for the syrup to strengthen.

Once the first batch is out, add more water to bring the level up to where you began (unless that was too much water). Add sugar (1/4-1/2 cup), and more red hots, maybe 1/2 of a bag. Stir the mixture and begin again.
It takes more red hots than you would think. I typically use 5-7 bags for 16 apples.
When all of your apples are cooked, pour a bit of the remaining syrup over them to keep them moist. Store them covered in the refrigerator. They keep for a very long time.
Enjoy!