A quilting tip…

I basted a couple of quilts last week and thought I’d share a trick with you. Whether you hand or machine quilt, here’s a way to protect the batting at the edges of your quilt while you are quilting. First, run a line of basting stitches not quite 1/4″ away from the raw edge of the top of the quilt. This holds the 3 layers firmly together at the edges.


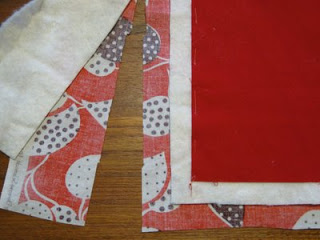
Trim away the excess batting, leaving about 3/4″ of batting beyond the edge of the quilt top. Trim the backing about 3/4″ away from the edge of the batting.


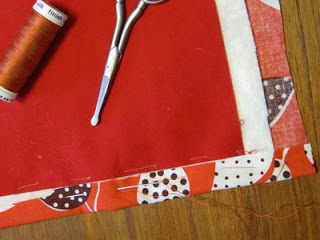
Fold the backing over the batting. Butt the raw edges of the 2 fabrics together. Baste the backing over the batting. Do this on all four sides of your basted quilt.

You’ll be surprised at how much this simple step will protect the outer edges of your quilt from stretching and fraying as you work. And it cuts down on the amount of lint generated when you machine quilt. 

50 very unusual buildings…

I found the link to the 50 Strange Buildings of the World on the blog, A Cup Of Jo. These buildings make me smile! 


This house is in Texas but, luckily, my house looks nothing like it. 

Have you seen this?

I heard about this video this week – I’m not very up to date with cool You Tube videos. I thought I’d post this for those of you who haven’t seen it either. The group, Straight No Chaser, has a Christmas album out now called High Spirits. You can buy it at Amazon or on iTunes.


Enjoy!

What to do with the kids…

My grandson, Jack, is just over a year old and is no longer content to just sit and play. He wants to be everywhere, all at once! He likes to push buttons on anything electronic – the TV, my computer, the printers, the modem – none are safe. He responds pretty well to “no” but I don’t want to be a constant “no” machine.


When he and Elanor were over a couple of days ago I got a shipment that came in a big box. It didn’t take me long to decide to make my own Jack-in-the-box!

He had toys that he threw out of the box. My job was to return the toys. He has me trained pretty well.


Elanor decided that she wanted in the box too. I was amazed that they could both fit.

We had fun with the box for 20-30 minutes which is a very long time when you are 13 months old. but it’s not nearly long enough when you’re 52!

All cleaned up…

Here it is, all cleaned up! This is still a garage. To be more specific, this is my garage, not Martha Stewart’s garage. Hers is probably full of way cool stuff. My garage is full of the stuff that cannot live in my house — and most of it is not that cool. But the things in our garage are things that we use at least once a year.

Notice the white walls! The space feels cleaner, and lighter. The white walls are what I wanted changed the most so that alone makes me very happy. 

Almost everything is off of the ground which makes it a lot easier to sweep out. You can see the leaves on the floor – they blow in every time we open the door at this time of year.

I love my blue door! I painted it (and the orange trim around it) a couple of years ago. It makes me smile every time I walk through it.

I haven’t shown you the little storage shed in our back yard. We tidied it up as part of this project. Now I can get to my flower pots and gardening tools without having to climb over stuff. I need to get a picture of that soon!

I have vowed to myself that when I put something in the garage, I’m going to put it where it goes. If it doesn’t have a spot I’ll find it one right then. I’m pretty good about doing that in the house so I’m hopeful that I can train myself without too much trouble. Steve is already good about putting things where they go (I am such a lucky woman!). I’ll let you know how it goes.

Tis the season to be tidy!

My husband and I were supposed to go on a hike this weekend with Steve’s brother, Charles, and his wife, Deborah, and 2 more friends. They bailed out on us which opened up the weekend for – oh happy day – the garage clean-up! 


This event was already on my calendar for this week, but it was not on Steve’s because of work. I figured that I would spend a full week on this project but with his help we got it done in 2 days! 

So – this is our garage, before… This is the left wall:


This is part of the left and back wall. The door leads into the house:


This is the right wall. The 4th wall is the double-wide garage door and we’re ignoring that.


The before-walls were sheetrock covered with a vinyl printed to look like paneling. We’ve been in the house 15 years and I have never been happy with the walls. I wanted white walls and that was a big part of this clean-up. Painting the walls meant that everything had to come off into a big pile in the middle of the garage. With 2 people doing the piling, it went fast. 

You can see the pile in this photo and the walls with the primer coat of paint. I’m a fast painter and, since this is the garage after all, I was not super-neat. I had both the primer and the finish coat on the 3 walls by 2:00 in the afternoon. I used latex paints and they dry fast!

Here is Steve beginning to put things back…


Steve was really great about doing this on the spur of the moment. The hike would have been lots of fun, and we’ll eventually get out there and do that too, but I am oh-so-happy to have this done!

I’ll show you pictures the the finished garage tomorrow. For now I have to sign off because the grandkids are due any minute – it’s babysitting time!

Later,

Becky