An interesting slideshow…

Japan from Eric Testroete on Vimeo.

I found this slide show at Abbey Goes Design Scouting. Eric Testroete took the photos from his trip to Japan and made a slideshow/video from them and set it all to music. Each image flashes by so fast that individual shots are hard to pick out, but the overall impression is pretty cool. The Vimeo site looks easy to use.

Imagine, if you had the discipline to photograph all the steps that went into making a quilt, you could build one of these slideshows and, perhaps, see the process in a new way. Or you could take a photo a day of your child (or children) and watch them grow. Really, I need a lot more time!

I received the following email from Dena today:

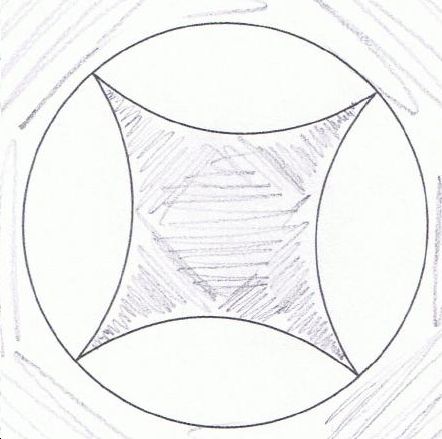
I am having a Piece O’ Cake dilemma and could use your advice. I’m appliquéing a block that will have both regular appliqué and reverse appliqué on the same piece. Your books & DVDs are still in storage so I can’t refer to them for the convex & concave process (and I just can’t recall which comes first).

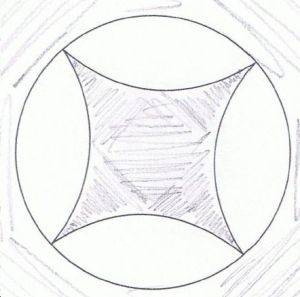
Should I appliqué the outside circle first or the reverse appliqué on the inside first? The background and inside the design are the same material.

Thank you for any help!

This was my reply, and I see now that I need to add a bit more info:

Hi Dena:

I wouldn’t try to cut these shapes with their 1/4″ seam allowances and then applique them. They’ll be too prone to stretching.

I’d make a finished size template of each piece and trace that on either a square or rectangle of fabric that is about 1″ bigger on each side than the shape you are working on. I’d do the applique, press, and then cut out the shapes (with their seam allowances) and sew the quilt together.

You’ll waste some fabric this way but it will be a whole lot easier to applique.

And here’s some additional info: I would generally do the reverse applique first but that could change depending on the specific design. When sewing concave and convex curves together, sew with the concave (inner curve) on top.

Happy stitching to one and all!

Becky

Where have I been!

I’m sorry – I’ve been so busy that I’ve forgotten to blog. I have no excuses. So, what have I been doing? I’ve been learning QuickBooks (which Linda knows inside and out, but I do not). I’ve been machine quilting, but not as much as I should. I’ve been working on supply lists.

I’ve been preparing for the LAST Jinny Beyer Seminar in Hilton Head. I am so thankful that I was asked to teach for her at this event. I hope to see some of you there! Karen Stone is teaching too (among others) and I’m looking forward to getting to visit with her.

Steve and I are building raised beds. Steve has access to lots of cedar trees that need to be cut down. So he went out with his trusty chain saws (the big one and the less-big one) and slayed some – it was economical and green.

Late this afternoon we got the first load of soil mix and I was shoveling. It’s going to take a little more than 3 pick-up loads.

I hope each and every one of you has had a good week and, as Arnold says: I’ll be back.

Supply lists…

Hello everyone! I have been tweaking my class page online in the hopes of making it even easier to read. I’ve just begun posting my supply lists with the classes. (That’s sort of an over-statement as I have only posted 2 supply lists.)

If you are like me, you want supply lists to be accurate, easy to understand, and only list the items that must be brought to class. If any of you have time to look at the “Sewing Sunny Flowers” supply list and furnish me with feedback, I’d appreciate it. You’ll find it on Becky’s Class Page, it’s the first class listed.

Be as critical as you can be. I’d much rather hear it from you than from students when it’s too late to fix it.

Thanks!

Becky

Trimming the edge…

Here’s another tip related to machine quilting: Once your quilt is quilted, you need to trim the outer edges of the quilt and then sew on the binding. When you trim, leave about 1/4″ of batting and backing fabric beyond the edge of the quilt top itself.

The raw edges of the binding are placed next to the raw edge of the top. The extra batting and backing will fill the binding nicely.

I like to “sign” my quilts as I quilt them. I load my machine with a slightly heavier thread (like King Tut) in a contrasting color. I do my best to capture my actual signature. I do also sew a documentation patch to the back of the quilt.