Tis the season to be tidy!

My husband and I were supposed to go on a hike this weekend with Steve’s brother, Charles, and his wife, Deborah, and 2 more friends. They bailed out on us which opened up the weekend for – oh happy day – the garage clean-up! 


This event was already on my calendar for this week, but it was not on Steve’s because of work. I figured that I would spend a full week on this project but with his help we got it done in 2 days! 

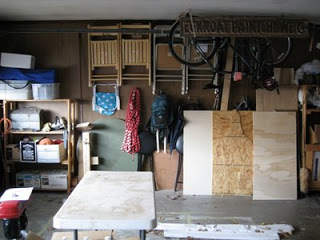
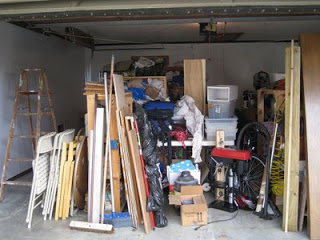
So – this is our garage, before… This is the left wall:


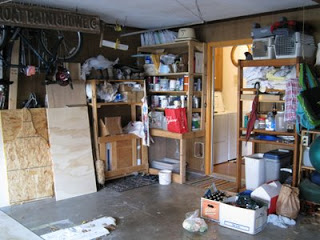
This is part of the left and back wall. The door leads into the house:


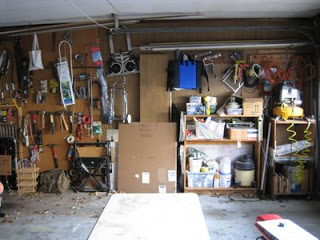
This is the right wall. The 4th wall is the double-wide garage door and we’re ignoring that.


The before-walls were sheetrock covered with a vinyl printed to look like paneling. We’ve been in the house 15 years and I have never been happy with the walls. I wanted white walls and that was a big part of this clean-up. Painting the walls meant that everything had to come off into a big pile in the middle of the garage. With 2 people doing the piling, it went fast. 

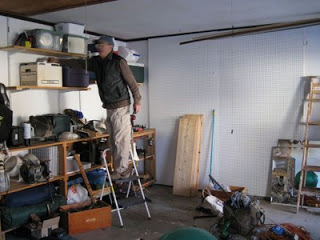
You can see the pile in this photo and the walls with the primer coat of paint. I’m a fast painter and, since this is the garage after all, I was not super-neat. I had both the primer and the finish coat on the 3 walls by 2:00 in the afternoon. I used latex paints and they dry fast!

Here is Steve beginning to put things back…


Steve was really great about doing this on the spur of the moment. The hike would have been lots of fun, and we’ll eventually get out there and do that too, but I am oh-so-happy to have this done!

I’ll show you pictures the the finished garage tomorrow. For now I have to sign off because the grandkids are due any minute – it’s babysitting time!

Later,

Becky

New BOM

I have been working on the next BOM. Yet, to have a title. I remembered a technique my first applique teacher taught me year ago. Jeanette Meetze is a great teacher. I thought you would like to see it. 

When appliqueing petals in a circle use this technique. After the petals are appliqued sew a basting stitch below the seam allowance to hold the petal ends in place. They tend otherwise to want to stick up. Quick and easy. I love quilting tips. 

Above if you look close you will see the white seam line. I basted just below it.
Now you are ready to applique the center down.
Blessings Linda

Sprucing up your Christmas tree…

I have a 7′ tall pretend Christmas tree. It is almost as old as my youngest son, Jeff, who is now 22 (or 23, I just can’t keep up!). It was one of the first pencil trees and it’s skinnier than any that are on the market these days.


Our house is not that big and I don’t want a bigger tree, but truly this tree has seen better days. Two years ago I decided that it needed a bath so I took the hose to it figuring that if it fell apart, it was a sign from above to move on. It didn’t fall apart.

Last year I decided that it needed more than another bath – it needed updating. I bought 2 cans of lime green spray paint thinking that I would change the color of the tree to lime green. I was amazed at how the paint seemed to soak into the tree. Instead of being lime green, it has lime green highlights. That just wasn’t enough of an update.


I got a can or two of spray glue and some coarse green glitter. I sprayed the tree in sections with the glue and sprinkled it liberally with glitter.


It’s way cute and a cheap upgrade! This year, when the tree came out of the box (after having spent another year in the attic) I hit it again with spray glue and glitter because I like things sparkly.
If you do this here are some tips:
  1. It makes a mess so I did this outside, over a plastic drop cloth. 
  2. Be careful where/how you shake the glitter off the drop cloth. I think I’m going to have glitter in the sand around the rocks in my patio for a very long time.
  3. Carry the tree inside carefully. Some glitter is going to drop off the tree as it is jostled.
  4. Concentrate the glitter on the outer parts of the tree, but don’t forget the undersides of the branches. My tree comes apart in sections which makes it easier to do the undersides of the branches (turning the whole tree upside-down would be hard).
  5. A word of caution – my tree is not pre-strung with lights. I don’t know if getting glue and glitter on the lights would be a fire hazard but I don’t know that I would do it.

Once you start playing with the glitter it’s hard to stop. Wreaths, candles, all kinds of things could look better with glitter! 


Becky

Quilter’s Chocolate tins

Many of you have seen our Quilter’s Chocolates in the cute tins. After consuming a lot of them. I do love milk chocolate. I started thinking about ways to use the chocolate tins. 

The other day I was in a hurry to get out the door to quilt guild. I always take applique to stitch. It helps me not talk during the meeting or volunteer for more than I have time for. I had pinned some applique pieces down the night before. I grabbed my bag with the block in it and was about to grab my sewing bag when the chocolate tin caught my eye. I put my needle, ThimbleIt, toothpick and some Frostings bobbins with the thread wound on them in the bag and off I went. It all fit nicely in my purse. I now also have a tin by my chair with bobbins I am using.

The other use I found was to put the snippets of thread and material in the tin. I am always looking for somewhere to put them. I hate all those snippets all over everywhere. 
Let me know if you find other uses for them. I will let everyone on the blog know.
Always trying but not succeeding in keeping my studio tidier.
Linda

My 2008 Christmas ornament…

I’ve made Christmas ornaments to give to family and friends for many, many years. The list of folks who receive ornaments have changed over the years – especially as children and nieces have gotten older and moved into their own spaces. Sometimes people move off the list when they downsize and no longer have room for more ornaments. I completely understand this as I, myself, am having trouble fitting them all in :-).


This year I made 19 little sparkly houses. I thought I’d share a little bit of the process with you. 

First I designed a pattern. I made a template of the main pattern. It was easy to cut strips the length and width of the house and then use the template to mark my cutting lines. I cut rectangles for the bases and roofs.

I made the houses from poster board – a light-weight, white cardboard readily available in the US. After I cut the shapes out, I folded them where I needed to using a bone folder (which is a really good tool). I glued the ends of the house together using Tacky Glue – a strong, fast-drying glue available in craft stores. 

I mixed up a solution of thin glue (Elmers and/or Tacky glue mixed with water) and brushed it on the houses where I wanted glitter to stick. I used blue, green, and white glitter to make houses in those colors.


After the glue/glitter dried, I glued and glittered the doors in a contrasting color. I cut tissue paper and stuck it to the inside of the windows. 

Next I glued each house to a base and glued its roof on. Luckily I remembered to punch holes in the roofs and strung a loop of wire (to hang them from) before I glued the roofs on!

I made pipe cleaner wreaths and glued them over the doors. I glued on rick-rack greenery and I added sparkly, fluffy snow to the roofs and bases and then… there they were! A cluster of festive houses ready to go off and spread Christmas cheer!

Every year one of the hardest parts of “ornament making” for me is deciding what to make. I enjoyed making these houses so well that I think I’m going to make a variety of different houses for the next several years. Imagine a village of little sparkly cardboard houses!

Answering some questions…

We’ve had some questions about the free block/project contest. (I really need to come up with a good name for this. Any ideas?) Anyway – here are answers to some questions you may be having:


We are picturing the projects as finished pieces, not unfinished blocks. Keep in mind, though, thatyour “project” doesn’t necessarily need to be a quilt. It certainly can be a quilt! But if you wanted to embellish an apron, or tea towel, or pillow, or garment, or whatever else you can think of – that could work too. Imagine your project in a book, inspiring another quilter to use the pattern the way you did!

We welcome entries from outside of the US. The deadline remains the same – there will be time to get your project to us for photography.

You may use any applique method you prefer.

If you have other questions, let us know and we’ll do our best to answer them quickly.

Happy stitching!

Becky and Linda

Anna asked a good question – Yes, you will get your project back if it is chosen for publication. We might need to hold onto it for several weeks – that is up to C&T. They need the actual projects in hand to check color.