Cinnamon apples…

Every year at Thanksgiving and Christmas my grandmother, Mabel Eckroat, made cinnamon apples. I cannot image a holiday without them! 

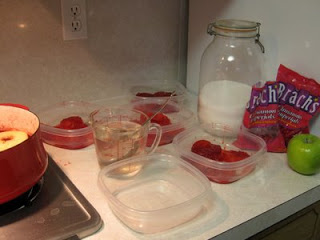
Cook apples in a mixture of water, sugar, and red hots. Use apples that are firm and round. Granny Smith’s are a good choice but. Choose a wide heavy pan to cook them in.
Begin early in the day. Pour 6-7 cups water into the pan (2-3″ deep). Add 1 cup of sugar and 1 bag of red hots. Turn the heat to low-medium. Stir occasionally until  the red hots are melted. 
 

Core, peel, and slice 2 apples into 1/4″ thick rings. Place the slices in the pot, overlapping as necessary. You can try cooking 3 apples at a time after your first batch.

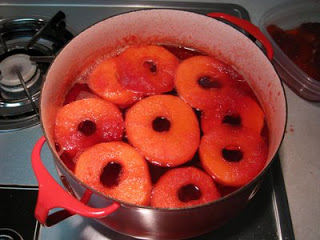
Let the apples simmer. When they look about like this (below), carefully turn them over with a slotted spoon. You can flip them more than once as they cook.
TIP: Keep your spoon in a 2-cup measuring cup that has water in it. If any gooey red hots get stuck to it they will get dissolved off the spoon.
 

The first batch takes the longest, up to an hour or more. If you have too much water, the apples will lose their shape. This corrects itself as water is cooked off. Too little water and the syrup gets too thick. You can add more water but it’s better to add it between batches. You should see simmering, not a rolling boil.
 

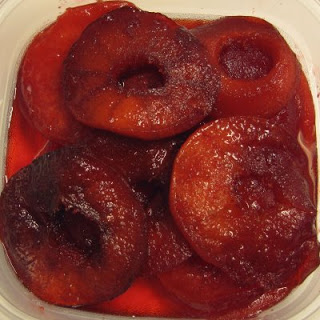
The finished apples look like this (below). NOTE: The first batch of apples may not be this dark. I think this is because the it takes a while for the syrup to strengthen.

Once the first batch is out, add more water to bring the level up to where you began (unless that was too much water). Add sugar (1/4-1/2 cup), and more red hots, maybe 1/2 of a bag. Stir the mixture and begin again.
It takes more red hots than you would think. I typically use 5-7 bags for 16 apples.
When all of your apples are cooked, pour a bit of the remaining syrup over them to keep them moist. Store them covered in the refrigerator. They keep for a very long time.
Enjoy!

Smaller Lorna’s Vine continued…

There were some questions in the comments in yesterday’s post about this quilt and I want to answer them here. Note that while the photos in this post are the same size, the quilts in the photos are different sizes.

The original Lorna’s Vine quilt is shown above. This quilt is 71″ x 71″. There are 36 vine blocks in it. 
I sewed together the blocks for the smaller quilt and put it on my design wall with some 8″ red border strips around it. Note that there are only 16 vine blocks. The pieced center is approximately 40″ x 40″. 

I had thought that I might piece the borders – maybe using 1″ squares in 4- or 9-patches. But the more I looked at this quilt on the wall, the more I thought that piecing would detract from the applique. Then I wondered about adding a narrow inner border…

I tried a couple of blue strips and decided that, even if they are pretty, they call too much attention to themselves.


I tried some gold strips… and I liked them better. I looked at the photos of all 3 versions of this quilt on my computer and decided to go with the gold inner borders. 


Here is the finished top. The inner border is 1/2″, the borders will finish at 7 1/2″. This quilt is bigger than I imagined it would be – approximately 56″ x 56″. But this is an excellent size for the wall or to use as a throw. Now I just have to get it quilted!

I’ve put together a PDF with the yardage and cutting instructions for this smaller quilt. You still need the book, but the PDF is free. You can click to get it on the Piece O’ Cake home page or on the Amish-Inspired Quilts page. Happy stitching!

A smaller Lorna’s Vine…

I teach the Lorna’s Vine quilt (at left) from our book Amish-Inspired Quilts. The quilt belongs to my daughter-in-law, Lorna, and I don’t travel with it. 


I decided that I needed a smaller version of this quilt to travel with. I finished the applique a few days ago and got the center of the quilt set together just now. I thought I’d share it with you!


Here it is on my design wall. I hope to add the borders tomorrow and I’ll share that image with you too. I hope to get it quilted before I teach it again at the end of January.

I have to be honest, I like the bigger quilt more. But I don’t have time to make it again full-size and I don’t have a place for a quilt of that size. My guess is that there are a lot of you who would prefer to make the smaller quilt too. Once I have all the measurements worked out, I’ll post the information to make the smaller quilt on our website. You’d still need the book, but you won’t have to do the calculations for the smaller one on your own.

FYI – If you look down 3 posts to the movie you’ll notice that I was taking these blocks off the wall in that movie. I didn’t actually take the blocks off the wall 3 days ago! My husband filmed me doing that at least 5 weeks ago. It’s taken me this long to edit the movie, do the voice-over, and get it posted. Many of you are sharp-eyed enough to connect these posts and I didn’t want you to get the idea that I am Applique Wonder Woman :-).

I returned from Houston last week. The quilt show was incredible. I love Quilt Festival the vendors and the quilts are Christmas to a quilter. I was there to serve on the International Quilt Association Board as Secretary. It is an honor to contribute to this wonderful organization. 

IQA is a non-profit organization. They put on the judged quilt show. Many of us have thought that Quilt Inc. puts the show on. They do the special exhibits. Quilt Inc. contributes to IQA in many ways.
 This year the quilts from DAR Museum was one of the special exhibits. It was the first time the quilts had been seen outside the museum. Wow! what a treat to see them. It is amazing what quilters accomplished back then. They are inspiring.
Pat Holly’s miniature quilt won an award. I just do not know how she got all the fine details in the quilt. Look for it in the IQA Journal. You receive it if you are an IQA member.
IQA is a great organization. Without them there would be no judged shows in Houston or Chicago. Another show will soon be added. IQA needs the support of you. The money from dues goes a long way toward putting the shows on. IQA also gives grants and promotes quilting. If you do not belong or have not renewed your membership now is the time. You can go to http://www.quilts.org to see the benefits of membership and join. Also you will see the many things IQA does. Please join now. We need each one of you to continue the quality of excellence the IQA show is known for.
While shopping I ran across a fun booth, Fiddlesticks. They use fine wire and fabric strips to make fun and funky adornments. I bought the Peppermint ornament. A great way to have fun with all your scraps. They have a book out Fast, Fun & Easy Fabric Fiddlesticks from C&T. Watch our web site for more. See the picture of their booth above.
I have so many ideas running through my mine from all the inspiration at the show. I see a still life quilt in my future. I have always been drawn to them. Something artsy with applique christmas balls. I made a list on the plane coming home. Never enough time. I have to figure out a plan to work on these projects and still meet my book deadline. A friend of mine Glenna Hailey with Holly Hock quilts once gave me some good advice. I was complaining about never finishing anything (this was before I had deadlines). She said if you would keep your butt home you would finish things. Every time I start to whine I remember what she said.
Till next time blessings 
Linda

Taking applique off the wall and making it portable…

I made a movie that shows how I take my blocks off of my design wall. I place the applique pieces on half of a folded sheet of paper (that has a smaller piece of flannel on it). the pieces are stacked so that piece #1 is on top and ready to sew. 


Once all the pieces are on the flannel, I fold the paper over them. I place the folded paper (with applique pieces) in a gallon-sized Ziplock bag. Usually the overlay will fit in the bag too. I carry my Frostings thread/bobbin sets, a pair of scissors, small pincushion, and toothpicks in a smaller baggie.

Enjoy the movie!