I made a video about the Color book a little while back and then promptly forgot to post it. I need another me to keep up with social media :-). At any rate, here it is! Let me know what you think.
I made a video about the Color book a little while back and then promptly forgot to post it. I need another me to keep up with social media :-). At any rate, here it is! Let me know what you think.
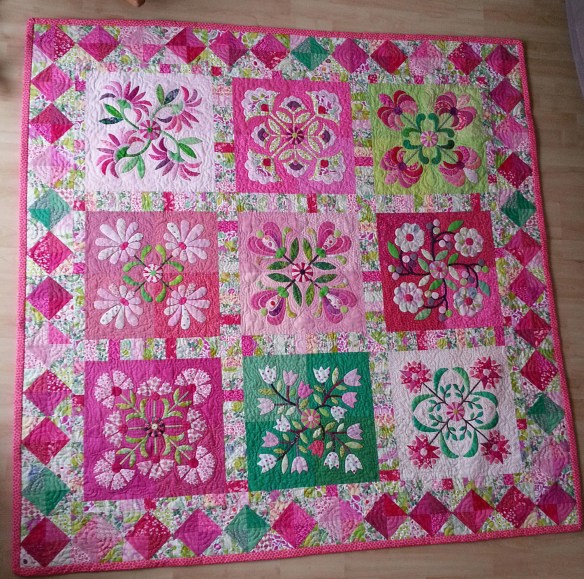
Isnt’ this lovely! Henrike Adam, from Berlin, made this quilt. Here is what she had to say:
I just wanted to thank you for your wonderful books, ideas and patterns. They’re all
a great inspiration for me and now that I finished my version of “Aunt Millies Garden”. A very good friend of mine (not a quilter herself) made following comment:
“It looks as being fourteen, first time in love and drawing tiny littles hearts on everything in your handwriting”.
It does look like young love! Thank you, Henrike, for sharing it with us.
In honor of International Quilting Weekend, March 20-22, 2015, The Quilt Show (www.thequiltshow.com), the web TV show hosted by Alex Anderson and Ricky Tims, will open all of its shows from the first nine series—shows 100-1513—for the entire weekend. I’m telling you today so that you can reserve time this weekend.
For three special days, everyone will have the chance to view over 200 shows, featuring some of the quilting world’s leading artists, for FREE. See—that’s big news!
This year’s sponsors are contributing over $5000 in prizes, including the Grand Prize, a BERNINA 550 QE. Other prizes you have a chance to win are:

Here I am with Alex and Ricky.
As you may already know, I appeared as the featured artist on TQS in show 611. If you didn’t have the opportunity to see this show the first time around, now you’ll have the chance to see it—and so many other terrific shows—at no cost in this unprecedented three-day offer.
I hope that you’ll share this information with all of your quilting friends. It’s a fantastic opportunity to enjoy three days of learning and fun without leaving your home…all for free.
Enjoy the shows, and thanks for helping to spread the word!
Click here to go to the TQS website landing page.
I set off my oh-shit-o-meter last night. Steve brought me a glass of red wine, setting it down next to my computer, as he does almost every evening. (He is really very good to me.) I knew it was there, the fault was entirely mine when I reached past the computer (exuberantly) and knocked over the glass, splashing/spraying wine everywhere. Well, not everywhere, but there were big drops on the floor as far as 4′ away.
The wine also spilled onto the stool next to the computer. The stool where I stack stuff. In this case, a basted quilt, folded backing side out. This photo is staged—I didn’t stop to take a picture last night. The papers on top of the quilt had been white. They are now seriously wine-stained, along with several other papers that I threw away last night. Luckily nothing much else was damaged.

Steve dealt with everything else while I grabbed the quilt and ran to the kitchen. First I tried drying the backing fabric with paper towels, which sort of worked. But, oh no, the batting was damp!!!
I grabbed a knife (because who has time to hunt for scissors in a crisis) and quickly cut the basting stitches.

I peeled the top back before the wine soaked through to the mostly white quilt top. I found some scissors and whacked out the stained batting.
After I caught my breath, I hand washed the stained backing fabric with Orvus. I was careful not to get it too wet. I didn’t want the wine stain to migrate farther. I can still see a little purple, but no one but me (and you) will ever notice it.

This morning I pulled back both the backing and the quilt top, placing the batting on a cutting mat. I cut a bigger piece of replacement batting and laid it behind the hole.

I used a ruler to cut straight edges through both layers, discarding the excess batting.

Then I basted the edges of the batting together.

I carefully placed the 3 layers together and re-basted that corner of the quilt.

That’s when I noticed a very light stain on some of the turquoise fabric in the quilt top. It wasn’t where the wine hit the quilt and then I remembered that that fabric was stained before I cut it up. I had washed it with something red which had bled, even though I had used a Color Catcher. I didn’t realize until this morning that I had sewn the stain into the quilt.

This stain is almost invisible and I don’t mind it. I suspect it will remind of how lucky I was, this time.

This is what happens if your light is way over there on the table and you are sitting too far from it. ‘Growing toward the light’ happens especially to hand sewers/appliquers. It is very hard on your back and shoulders.
Place your light in position so that you can sit up straight and see what you are doing, both at the same time. This probably means that you need an adjustable floor lamp. I use my Stella floor light, but there are other lamps that also work.
As always, pay attention to your posture.
If you are right-handed, the light should come from the left. Left-handers, the light should come from the right. In both cases this keeps the shadow from your dominant hand from falling on your work, where you are trying to see what you are doing.
I recently taught at Quilt Fiesta in Tucson. (It is fun show if any of you can make it next year!) There were lots of quilts, and there were vendors. I walked the vendors at a slow time and darned if Jamie didn’t rope me in…

How have I missed the EuroSteam booth at every quilt show I have ever attended? Who knows. But this time Jamie had my undivided attention and darned if she didn’t sell me a EuroSteam iron. (Let me just say, she’s good at her job.)
You can buy the iron online, but it’s cheaper at a show. Plus you get to talk to a person who is very familiar with it.

This is a heavy iron, which is fine with me. It has a ceramic sole plate that is supposed to never scorch. Dandy! It has an aluminum water reservoir, not plastic, so should last longer.
You see that plastic/silicon thing it’s sitting on? The iron lives there. It should never, ever, be stood up on it’s end. Jamie was very clear on this point. Enough so that I have not forgotten.
Jamie showed me how to use the measuring cup that comes with and was very clear that I should never, ever, (ever!) use distilled water. Irons need the minerals in the water. Without them, they spit (I forget why). There is a very good chance that I have ruined previous irons all on my own by disregarding the instructions to use tap water. The end of the long spout is flexible so that you can fill the iron while it is flat.

This iron puts out lots of steam. And it does the job. Here is cotton/linen before:

And then after a quick-ish press:
The EuroSteam works better than my most recent irons. It cost $200 and, if it continues to work well, I will consider to be money well-spent. If you are interested, look for EuroSteam at your next quilt show and try one before buying.
FYI: If you read the instructions that come with the iron, you will find lots of warnings that lead you to think that if you don’t relieve the pressure in the iron (release steam) every 10 minutes it might blow up. Jamie assured me that I could pretty much ignore that. I didn’t mean to, but I did walk off and leave the iron hot and plugged in, with water/steam inside, for over an hour. It did not blow up. I am not saying that you should ignore the safety warnings, but I personally didn’t let them frighten me off.
And, back to the water: Sherman water is full of appliance-killing calcium and salt. Jamie said to use bottled water if I wanted to, just not distilled. I was about to use what I thought was bottled spring water until I looked at the label and noticed that it said ‘purified’. I googled it and it sounds like purified water has a lot of the particles removed from it, making it similar to distilled water which is not good for the iron. I chose to use tap water instead and will look for bottled spring water for my iron.
And I have promised myself that I will follow Jamie’s instructions and drain my iron when I’m done for the day, every day. Cross my heart :-).


