A Simple Hand Sewing Needle Guide

Have you made one of these cute needle caddies yet? If not, you can find the FREE ePattern for the Big Needle Caddy at pieceocake.com, While you are there, you might be interested in the other FREE ePatterns. But you don’t have to make a needle caddy to be interested in knowing more about hand sewing needles.

I am careful to pair a needle with the kind of sewing I am doing, and the thread that goes with it. Since I do a variety of kinds of stitching, I like to have a variety of needles to choose from with me when sitting down to sew. This is how I filled my own needle caddy.

First, you need to identify each needle so that when you need more, you know which package to choose. Cut a strip of paper to write the needle particulars on, grab a pen or pencil, and gather your needles. Which needles, you ask? Why… these needles!
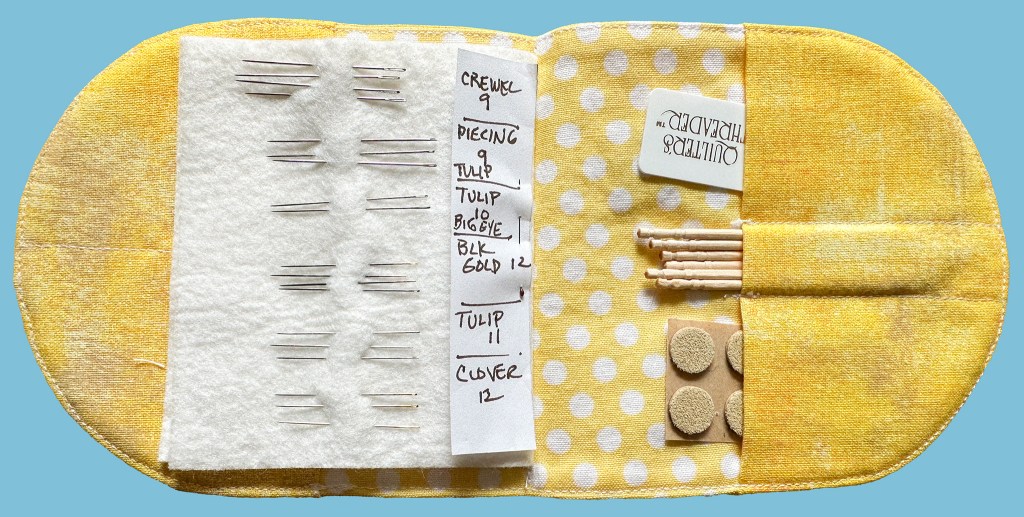
  • #9 Crewel Needle by Bohin: This is a very versatile needle with a long eye and strong body. Use it with wool thread, perle cotton, and 30-40 wt cotton thread. Great for embroidery, big stitch hand quilting, and some hand sewing.
  • #9 Piecing Needle by Tulip: An all-purpose needle good for a variety of hand sewing jobs, especially hand piecing. This needle is a little long, with a sturdy shaft. If you have trouble handling smaller needles, this and the crewel needle above might be good choices.

The next four needles will work better with fine thread like Superior’s 50wt/2-ply thread that only comes on prewound bobbins. Presencia’s 60wt/2-ply thread, Aurifil’s 80wt, and Aurifil’s 50wt/2-ply thread are also good choices with these needles.

  • #10 Big Eye Appliqué Needle by Tulip: Tulip applique needles are smaller and finer than their size number would indicate. The big eye on this needle makes it easier to thread. It is longer than #11, but not as long as a milliner’s needle.
  • #12 Black Gold Appliqué Needle by Clover: This needle is tempered and honed to a very sharp point. It is rigid, not bendy. I get a very nice, small stitch with this needle.
  • #11 Appliqué Needle by Tulip: Very much like the previous needle, but this one is more flexible. I use them interchangeably except that sometimes my fingers have a preference. I don’t know why, but that’s true.
  • #12 Gold-Eye Appliqué Needle by Clover: This is a very nice, affordable, serviceable needle that you can count on. And I did mention… affordable.

Note that when the package says “appliqué” needle, it is often a sharp. A sharp is a needle most often associated with hand sewing. It could also be a longer milliner’s needle which is associated with hat making. Look close and the package will probably tell you which it is.

One of the best features of this needle caddy are the little pockets, shown in the photo above. Mine pockets hold round wooden toothpicks, Leather ThimblePads, and 1-2 flat needle threaders like Roxane’s RX Needle Threaders. 

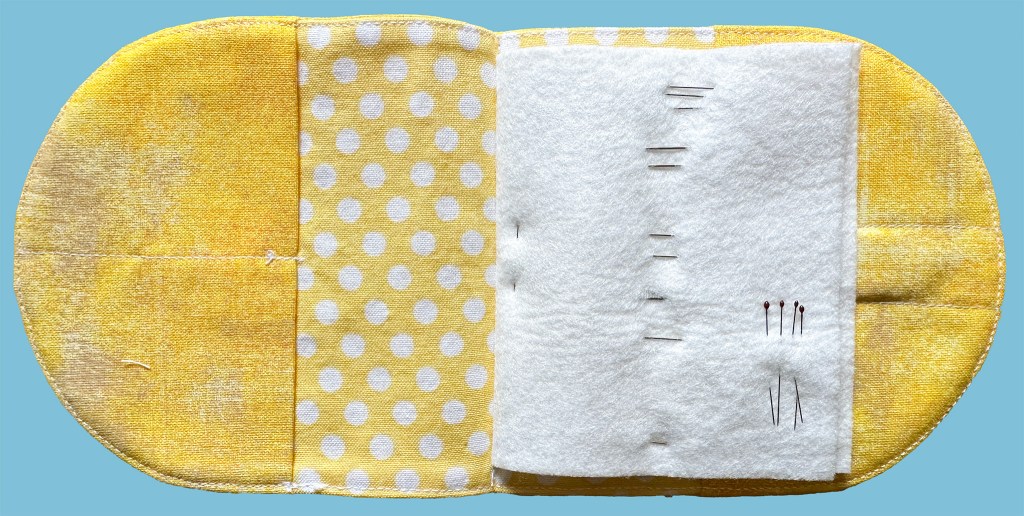
Each caddy has two bamboo felt “pages”. My 2nd page holds needles I use less often. Any of the first three listed below would be good with strands of embroidery floss.

These are applique needles that I sometimes use:

  • #11 SuperGlide by Colonial: I almost never use this needle. It’s bigger than my preferred appliqué needles, but not as big as the #9 piecing. It is easy to thread!
  • #12 Appliqué Needle by Mary Arden: This is an excellent, inexpensive needle. The eye is kind of big which is not a bad thing. The needle is a good size, fine, and sharp.

There are two more little inside pockets inside the back page on the other side. I will add a Domed Under Thimble with adhesive pads in one of them.
Click the names of individual needles above to find them on my site or go to Everything In My Needle Caddy, to find them all.

There are lots of good needles out there, these are the ones I use most. And I still recommend Sewing Needle Guide for Hand Stitching by Laura Wasilowski for a more complete and easy-to-slip-in-your-bag needle guide.

Show and tell: Steve’s Birds

Marie Szlachtianshyn sent a photo of her Steve’s Birds blocks to date. They are wonderful! I’m glad that you are enjoying sewing the birds. It is true that the little feet and eyes can be a challenge—but you are handling that challenge very well!

Look close and you can see that Marie’s blocks are not sewn together yet. If you are following my layout, you can’t sew them all together yet because this is not a quilt that sets together in rows. That’s not a bad thing! Try out sashing ideas as the blocks accumulate but know that, as you make more blocks, your idea of what is the best sashing fabric may change.

Click here to find Steve’s Birds Block of the Month.

Show and tell… Steve’s Birds coming later this year

Linda has all of the block of the month patterns because she’s my (not all the way retired) partner and special. These 4 blocks are in your future!

Greater Roadrunner

Linda is choosing the colors that she thinks the birds should be, whether they are that color in real life or not. I love them!

Scissortail Flycatcher
Carolina Chickadee
Great Blue Heron

Show and tell… Steve’s Birds

Jami Smith, one of Linda’s stitching friends, sent me photos of her blocks so far. Looking good, Jami! I love the backgrounds you put behind these birds :-).

Arctic Tern
Mississippi Kite

Show and tell… Steve’s Birds

Judy Ullman wrote to say that she is enjoying researching the birds and used a collage method on Mickey Lawler Skydyes fabric. Well done, Judy! You found a really creative way to use the patterns! Thank you for sharing and it will be fun to see what you come up with next :-).

Carolina Wren
Florida Scrub Jay

Show and tell… Circles!

From Joan:

I just watched and enjoyed your video about preparing circles, since I recently finished appliquéing 81 flannel circles unto flannel squares. This is what I did. (Much similar to your process with a couple of minor differences.)

Notice the Easy Needle Threader in background and Needle Caddy… more on the needle at the end of the post.

I used the perfect circle template from Karen Kay Buckley. Borrowed it from my friend Jackie. Hers came with a thicker acrylic 2.5” circle to draw around and all the plastic/teflon templates. Drew all 81 circles at once, then cut them 2 at a time with roughly 3/8” seams allowance. Then with all my cut 2.5” cookies stacked, I worked on 4 at a time. Sewed around outer edges, starting with a “knicker knot” (demoed by Sue Daley in another video for EPP—a PS from me at the bottom of the post) and left a longer tail to pull gathers. I found that a regular quilters knot pulled through too easily.

My first few circles I tied knot at end, but found it sometimes difficult to get the plastic template out after pressing, so I left the tail loose to pull while pressing and then again to make adjustments to pleats & gathers after template removed. Making 4 at a time proved to be perfect timing for me since it took about that long to press and then cool enough to handle. I only used water in a spray bottle to press, not starch. I pressed them flat one more time on my wool mat. Again I made stacks of 2.5” red flannel cookies. 

Notice the Travel Sandboard that Joan is working on!

Now begins the hand sewing. It started out a bit tedious since all the circles were red tweed print and all squares were a black dark check. So they come off as red on black. But I made sort of a game of it as I got into it. I had maybe 15 done when I decided to time myself without racing, just to see how long it actually took to sew a circle down. Each one took less than 10 min. My game became: stitch 5 in the morning before I started my day and 5 in evening while watching tv or before working on something else. Easy enough to do without getting bored. I made a little pile of 5 each and in no time I had all 81 done in about 10days. And it made it less tedious!! 

Now I get to start making the square-in-a-square blocks. They have been my nemesis for quite some time but after this quilt, I should have them conquered!! All the blocks will be different colored plaids, checks, so not tedious at all. I will put a wool batt inside and do some big stitch in blocks with maybe an X in center of each circle. Making it for my husband, he knows nothing at this point and he will love it. No rush for finish. 

So that’s my circle story. Joan

Thank you, Joan, for sharing your circle adventure! This is going to be a wonderful surprise for you husband. It will surely keep him warm :-). Also, your circles are wonderfully round and perfect. Nice!

The Needle Caddy pattern is free at pieceocake.com—click here. From Joan: “My friend Jackie made the needle caddy and gave it to me some time ago. Then she made more for group gifts; she asked if I wanted another…absolutely!! I keep that one in my wool appliqué supplies. So I have 2. Lucky me!”

PS: The knicker knot has been around a while. I learned it years ago and replaced it with my ending knot, which has also been around a long time. Both are good knots to use to end a line of stitches or at the beginning, when sewing coarser fabric like flannel where a quilter’s knot pulls through.